Monday, May 21, 2012

Around the garden end of May

Ah, spring! I love, love, love this time of year. The temperature is in the mid 70's, we are getting enough rain that I am not spending hours watering and the weeds have yet to overwhelm me. Let me show you a little of what is happening right now in my garden.

My clematis is in full bloom and the scent blows me away every time I walk by. We never set up our citronella candles last year and the clematis has now grown up and threw them.


My bridal wreath spirea is in full bloom and cascading down the retaining wall and on to my worm compost bin.


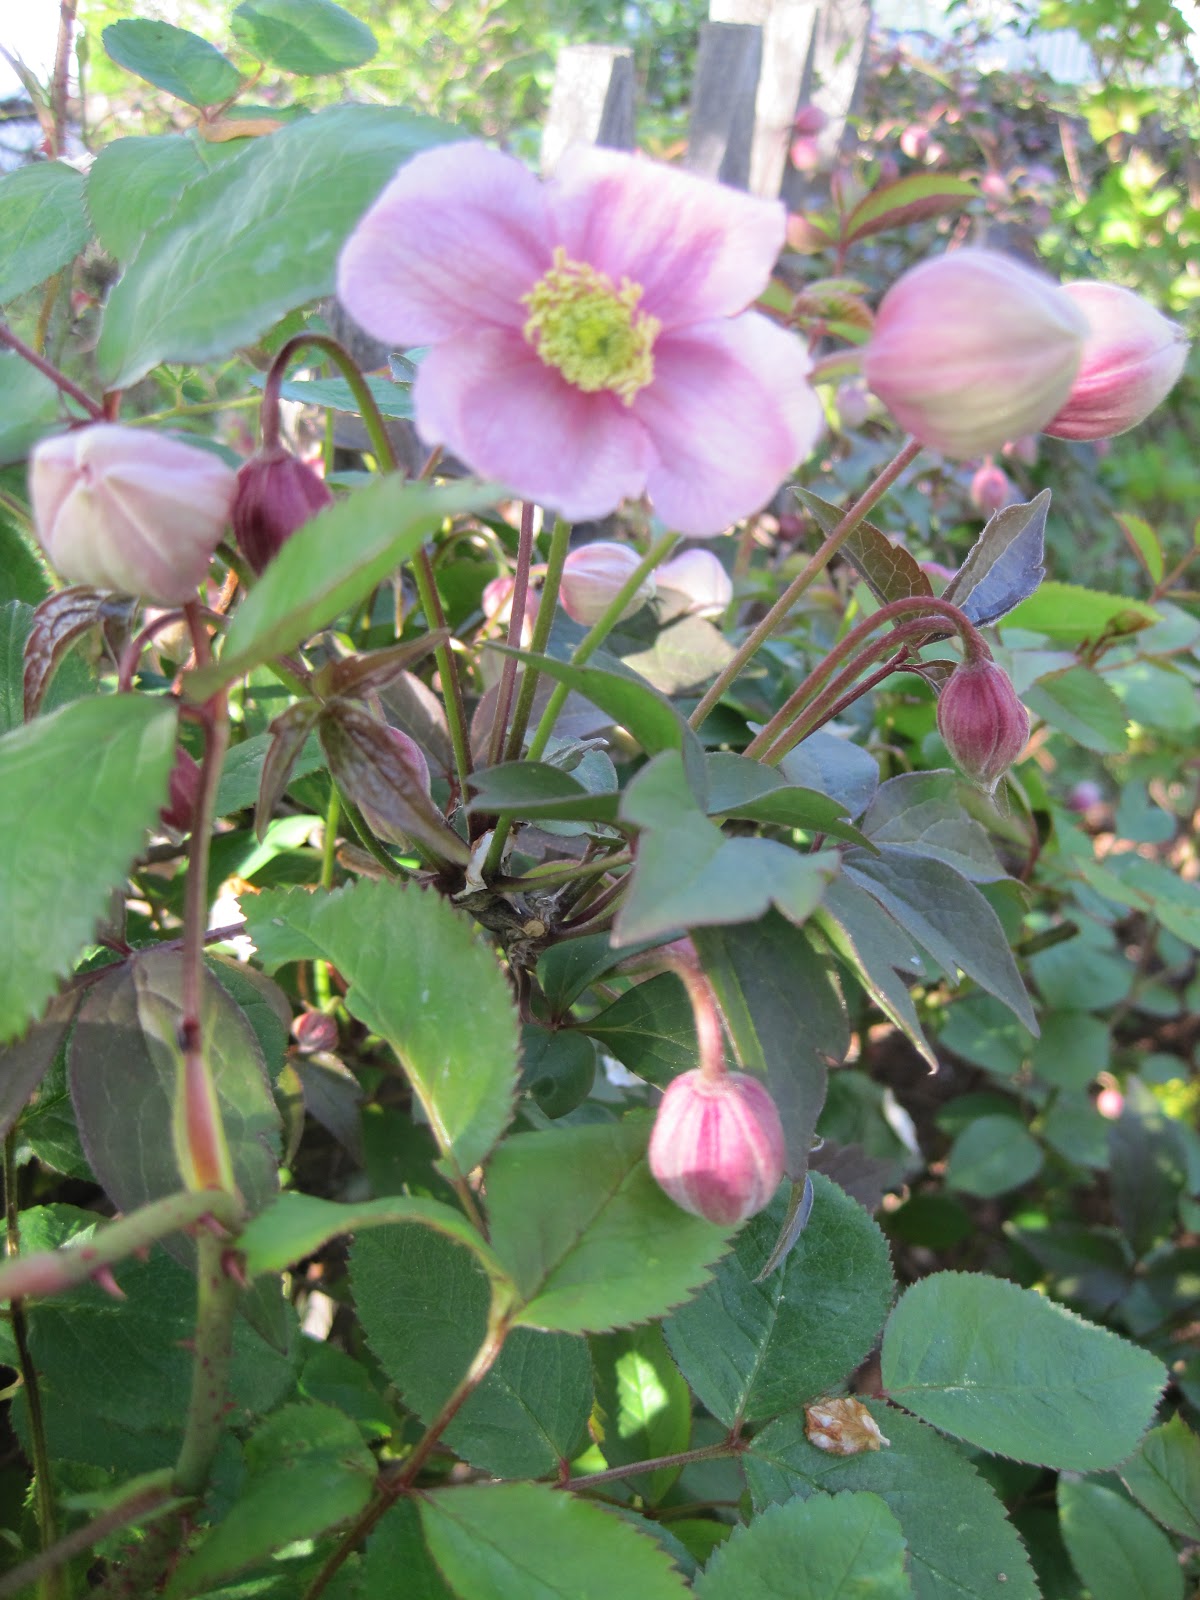
 In my shade garden the Hosta have fully rolled out their leaves and the Lilly of the Valley is in bloom. Here the Helleborus is still looking good after beginning to bloom in February.


This is my favorite Hosta but because I got it a garden club plant sale I have no idea what it's name is.


 When I plant seed or summer bulbs in my garden I mark them with twigs or here a chopstick so that I don't plant over them before they emerge. I have a bad habit of not remembering where I have planted seed and when I see a blank spot in my garden I fill it! This is the seedlings of White Lace Flower, a Queen Ann's Lace like annual with clean white bloom that I have never seen available at a garden center. I got the seed from here.


My irises are in full bloom in what I call my driveway garden. I practically divide these every year, they thrive in the full southern exposure and heat between the driveway and the house. I think they smell like candy- which means I really like them. In between them is Daylilies which will bloom in the summer as well as my Dahlias which will keep this area in bloom until the first frost.


 This is a pink poppy getting ready for an amazing show. I got this plant as part of a six-pack of mixed baby Poppies so I didn't know it's color until last year. I probably would not have put it with a bright orange Iris if I had, this will be what I call a retina burning color combo!


One of my all time favorite shrub, the Red Veined Enkianthus.  They are slow growing but as a result really never need pruning. They have these great bell shaped flowers in the spring then great red foliage in the fall.


 Columbine seed regularly in my garden, this one chose to try to make my ugly front stairs look better.


Not everything in my garden is sunny happy and good. I have these little stinker on my Viburnum. The first picture shows the tell tale damage the second picture you can see the culprit.This little stinker is viburnum leaf beetle larvae and is left they can defoliate nearly the entire plant. My plan of attack it to clip off and depose of most of the affected branches then spray with BT.  Bacillus thuringiensis is a stain of bacteria which can kill caterpillars and larvae but is not harmful to other insects in the garden. You can find it in most garden centers.


So not to end my post with a picture of a bug here are a few of my peonies getting ready to bloom- happy gardening!


Tuesday, May 8, 2012

Not your Grandmother's Clematis!

I have always thought of clematis as that skimpy vine on a mailbox with one or two enormous flower in colors so bright they didn't look real. I never would have wanted this plant in my garden before reading an article on different varieties of clematis in a magazine one winter. I was blown away by some of the pictures and the following spring was searching them out at my favorite nurseries.

My all time favorite is the one in my header- Clematis 'montana' rubens. This woody clematis can get 20 feet high and 15 feet wide and will be covered with pale purple  flowers in early summer/late spring. Oh- and they are fragrant! They smell like vanilla- amazing! They grow in full sun to part shade in zones 5-10. Here is mine I just took a picture of in my garden getting ready to open.


clematis montana

My second favorite and one I have planted with the montana above is sweet autumn clematis (Clematis paniculata). This one is covered with fluffy white star shaped blooms in clusters in late fall and is also fragrant! You can grow this anywhere from zone 4-10. It is a prolific plant so if you have something you want to hide this may do it.


Sweet autumn clematis

Did you know that there are types of clematis that are not vines? Neither did I! Check out this cutie.

Non climbing type of clematis


Clematis seed pods
Clematis integrifolia is a non climbing garden type that works well in part sun to full sun zone 3-7.

If you go out and buy a clematis make sure to read the tag for pruning instructions, some come back on old would while other die back to the ground. They have always said clematis likes their roots shaded but the plants want full sun. I have some in full sun and some in part shade, both areas work well for me I just make sure to mulch them well.

Friday, April 27, 2012

Tall Raised Garden Beds for the Yard with Dogs!

Having a raised garden bed makes veggie growing a little easier for several reasons. In a raised bed the soils warms up  and dries out quicker for spring planting. They are easy to weed as the box is all contained and you can put copper strips around the box like this to prevent slugs. Most people use single 2*4's or 2*8's and frame out a simple box then fill it with top soil and some compost.

I have dogs- three of them.

Here they are in a field of daisies
Dogs don't get not to walk over a 4inch piece of wood and spring soil with little seedlings seems like a great place to lie down and take a nap. My male dog likes to pee against things and really that is not good when you are growing veggies. Rather then putting up prison barb wire around my vegetable bad I just went higher, like 16 inches high.

Out 16 inch raised garden bed

 We found a small local mill and bought rough cut hemlock boards for the beds. The rough boards are a little thicker then what you would find at a hardware store and cheaper. Hemlock tend to be rot resistant and coast about a third of what cedar costs. Wood for this bed cost us $95 total.


 We went with a simple design using 2*8 boards and made the bed 16 feet long by 30 inches wide and 16 inches tall. Then used heavy duty screws with washers to assemble.


Because the bed is so long we actually made it in to two beds so that they stress on the boards by the weight of the soil would be less. We also plan to make a cold frame from an old glass door that will fit on one side or the other of the bed.


The dogs could still get into the bed if they wanted but I have found that they don't. This will cost more to build then a lower bed but if you have back problems or dogs you wont regret it!

Monday, April 23, 2012

Dividing Perennials

Spring is a perfect time to divide herbaceous perennials.  As perennials get bigger they can start to crowd other plants growing near by or die out in the middle as they creep away from the original spot you put them in. Some tall perennials will get leggy and fall over as they bloom when the plant has gotten too big.

 By dividing them you can move part of them to a new area or set up a plant exchange with your friends! If you are wondering what perennials would be good to divide in the spring here is a good list.

I am big on learning by pictures so here is examples of dividing three different perennials. My two tools that I use form this job is a good fork and a sharp flat shovel. The fork is terrific for lifting the plants out with out breaking a lot of roots and it can navigate the rocky soils of New England. The shovel needs to be flat at the bottom to break the clumps up once you have them out.

What you will need

My daylily to be divided

Use the fork to gently lift the daylily.
After lifting the daylily out from all sides this you can lift up the whole plant.

Take the flat shovel and break the plant in half
I broke this clump up in three pieces

I replanted one clump back in the original spot

Always water, even if the soil is wet!
This is a fall blooming aster which has shallow roots and spreads easily.
For this one rather then lift the whole plants I digs out sections with my fork.

I left a clump where I wanted it and dug out the rest.

Here are the plants I now have for another place in the garden or to give away.
Sedum to be divided

After lifting the plant I am using my shovel to break it up.
I got three pieces from the one sedum plant.

I replanted one piece in the original spot.
The best time to do this is right before a rainy day. If you plan to plant or give the new plants but wont get to planting them for a while pot them up with some potting soil and place the pots in partial shade. Make sure to keep an eye out so they don't get too dry until they have been established. Happy dividing!

Monday, April 16, 2012

Compost- How to do it wrong, like me!

Look in any garden catalog and you will find compost  temperature gauges, bio enhancer,  accelerators and picture of people smiling hold what looks like black flour that has come out of some supper doper composter. I have never gotten my compost to look like that and I don't want to - so there. My compost looks something like this;

My "finished" compost


You can clearly see what used to be leaves and stems- it looks like what people rake up in late spring when they didn't get around to cleaning their garden in the fall and it pretty much what it is. In the fall I take out my handy dandy leaf sucker thing that vacuums leaves then chops them up and collects them in a little bag then I dump them into my pile. I cut back non woody perennials and I toss that in to along with some grass clippings from my neighbor. I have a simple compost pin made out of four pallets.
 

Cleaning out my compost in the spring


 I don't put kitchen scraps in this compost pile because it is open and may attract wonderful things like skunks. I do compost kitchen scraps with the help of some little red worms  in a closed bin so that critters don't get at it. Here is my worm compost bin.

For the worms I keep this in a shady area so it doesn't get too hot.


Simply put food scraps at the top and harvest compost out the bottom.
Worm compost

Worm compost used as mulch


 I don't figure out the carbon to nitrogen formula, I don't turn it  weekly, I don't take it's temperature, I just wait until spring. In late spring after the soil has warmed and seedling have emerged I give my beds one good weeding then I put soggy mats of this stuff around all my plants a good couple of inches thick. I like mulch that breaks down easily. and then adds to the soil.  Bark and coco hulls are decorative but the don't add anything to the soil and they cost money. By mid summer the mats of compost I have put down has completely decomposed and it is time for me to clean out my compost pile and re-mulch again. After a few years of doing this you can stick a folk any where in my garden and it will be dark crumbly soily goodness.

Garden beds with compost mulch

Roses with compost mulch

Monday, April 9, 2012

Making a Drift Wood Wreath

I live by the ocean which I am for ever grateful for. I can not walk down a beach with out ending up with something in my pocket and usually it is drift wood. Years ago my aunt who is an artist extraordinaire started making driftwood wreaths to sell at her church fair, I fell in love. Here is a picture of one in her house, I'm not the only one with sandy pockets after a beach walk.


I started to make them and offer them to brides who were having seaside weddings, they have been pretty popular. Here are two framing the doors of a church


I have also made them with the center of the wreath being more like an open circle like this.


The are ridiculously easy to make you just need to collect enough driftwood and  few supplies. I start with a flat ring sold at most craft stores like this.

You will also need a glue gun and lots of glue!


You can use a wire to hang it or

ribbon

Start by placing a few pieces to get the shape, don't glue anything yet.

fill in some of the spaces, make sure to have little pieces to fill in the gaps.


Keep filling in until you have just small parts of the frame showing.

Fill in gaps with your little pieces


I like to get the whole wreath nearly done before I start to glue, it is a lot easier to move pieces around before they are glued on the frame! When you are pretty done you can start to glue by just picking up a few pieces at a time and gluing them in place. 


 When you are done you will have some glue visible, don't worry about that just give the glue some time to dry. When the glue is dry you can use a hair dryer to blow the wispy glue off and then just pick off any larger pieces.

 When you have finished your wreath decorate it how ever you like. I collected some mussel shells and periwinkles and just made a little flower with them.

Drift wood wreath done!


Have fun and enjoy!